
In order to ensure optimal performance of your PS4 Slim, it is essential to keep the fan clean and free from dust and debris. The fan plays a vital role in cooling down the system and preventing it from overheating.
In this article, we will discuss the importance of a clean PS4 Slim fan, potential issues caused by a dirty fan, the necessary cleaning tools, how to prepare your PS4 Slim for cleaning, and a step-by-step guide to cleaning the fan. Lastly, we will cover the process of reassembling your PS4 Slim after cleaning.
Understanding the Importance of a Clean PS4 Slim Fan
The PS4 Slim fan plays a crucial role in maintaining the overall performance of the system. It is responsible for cooling down the internal components and preventing them from becoming overheated. By keeping the fan clean and free from dust and debris, you can ensure that your PS4 Slim operates at its maximum potential.
The Role of the PS4 Slim Fan in Performance
The fan works by drawing in cool air and expelling hot air from the system. This process helps to regulate the temperature inside the PS4 Slim and prevents the internal components from overheating. By maintaining a clean fan, the system can effectively cool down, allowing it to perform optimally.
When the PS4 Slim is in use, the internal components generate heat. Without proper cooling, this heat can build up and cause the system to overheat. Overheating can lead to various issues, such as system instability, unexpected shutdowns, and even permanent damage to the internal hardware. That’s why the PS4 Slim fan is so important – it helps to dissipate the heat and keep the system running smoothly.
Imagine playing your favorite game on your PS4 Slim, fully immersed in the virtual world. Suddenly, you notice that the system starts to lag, the frame rate drops, and the graphics become choppy. Frustration sets in as you realize that your gaming experience is being compromised. This could be a result of a dirty fan. Dust and debris can accumulate on the fan blades and hinder its ability to effectively cool down the system. As a result, the internal components struggle to maintain their optimal operating temperature, leading to reduced performance.
Potential Issues Caused by a Dirty Fan
A dirty fan can lead to various problems with your PS4 Slim. Firstly, it can cause the system to overheat, which may result in unexpected shutdowns or reduced performance. Additionally, a dusty fan can become noisy and disrupt your gaming experience. Therefore, regular cleaning is essential to prevent these issues.
When the fan becomes clogged with dust and debris, it has to work harder to move air through the system. This increased workload can cause the fan to spin faster and generate more noise. The constant whirring sound can be distracting and take away from the immersive gaming experience. Moreover, an overworked fan can wear out faster, leading to potential fan failure. This can further exacerbate the overheating issue and potentially cause permanent damage to the internal components.
Regular maintenance and cleaning of the PS4 Slim fan can help prevent these issues. By removing the accumulated dust and debris, you can ensure that the fan operates smoothly and quietly. This not only improves the overall performance of your PS4 Slim but also prolongs the lifespan of the system.
Gathering the Necessary Cleaning Tools
Before you begin cleaning your PS4 Slim fan, it is important to gather the necessary tools. This will ensure that you have everything you need to effectively clean the fan without causing any damage to the system.
First and foremost, you will need a can of compressed air or a small vacuum cleaner with a brush attachment. These tools are specifically designed to remove dust and debris from delicate electronic components, such as the fan in your PS4 Slim. The compressed air can be used to blow away any loose dust particles, while the vacuum cleaner with a brush attachment can gently suck up any remaining debris.
It is crucial to select a cleaning product that is safe for electronic devices. Look for compressed air cans that are specifically labeled as suitable for cleaning electronics. These cans usually contain a non-flammable gas that is safe to use on sensitive components. Similarly, if you opt for a vacuum cleaner, make sure it is designed for electronics and has a brush attachment that won’t scratch or damage the fan or other internal components.
Identifying Appropriate Cleaning Products
When it comes to cleaning the PS4 Slim fan, it is recommended to use compressed air or a small vacuum cleaner with a brush attachment. These tools can effectively remove dust and debris without causing any harm to the fan or other internal components. Be sure to select a cleaning product that is safe for electronic devices.
In addition to the cleaning tools, it is also a good idea to have some cleaning solution or isopropyl alcohol on hand. These can be used to clean the outer casing and other surfaces of the PS4 Slim. However, it is important to note that you should never apply cleaning solution or alcohol directly to the fan or any internal components, as this can cause damage. Instead, dampen a soft cloth or microfiber towel with the cleaning solution and gently wipe down the surfaces.
Safety Equipment for Cleaning Your PS4 Slim Fan
While cleaning the fan, it is important to prioritize safety. Make sure to wear a static wristband to prevent any static electricity from damaging the system. Static electricity can build up on your body and transfer to the sensitive electronic components, potentially causing irreversible damage. A static wristband, also known as an anti-static wrist strap, helps to dissipate any static charge and keeps you grounded while working on your PS4 Slim.
In addition to the static wristband, it is also a good idea to work on a clean and static-free surface. Avoid working on carpets or rugs, as they can generate static electricity. Instead, opt for a hard surface like a wooden table or a desk. You can also place an anti-static mat or a piece of cardboard underneath your PS4 Slim to further minimize the risk of static discharge.
Lastly, when wiping down the outer casing and other surfaces of the PS4 Slim, make sure to use a soft cloth or microfiber towel. These materials are gentle and won’t scratch the surface of your console. Avoid using paper towels or abrasive materials, as they can leave behind lint or cause scratches.
Preparing Your PS4 Slim for Cleaning
Before you can begin cleaning the fan, it is crucial to properly prepare your PS4 Slim. This involves safely powering down the system and removing the outer casing to access the fan.
Keeping your gaming console clean is essential for optimal performance and longevity. Over time, dust and debris can accumulate inside your PS4 Slim, causing the fan to work harder and potentially leading to overheating issues. By following the proper cleaning procedures, you can ensure that your console stays in top shape and continues to provide you with hours of gaming enjoyment.
Safely Powering Down Your PS4 Slim
Prior to cleaning, it is essential to properly shut down your PS4 Slim. This not only ensures your safety but also prevents any potential damage to the console. To power down your PS4 Slim, follow these steps:
- Navigate to the power options in the system menu.
- Select the “Turn Off PS4” option.
- Wait for the system to completely power off before proceeding with the cleaning process.
It is important to note that abruptly unplugging the console without properly shutting it down can result in data loss or even hardware damage. Taking the time to power down your PS4 Slim correctly is a small but crucial step in maintaining its overall health.
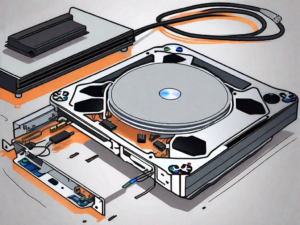
Removing the PS4 Slim Outer Casing
Once the system is powered down, you can move on to the next step: removing the outer casing of your PS4 Slim. This will grant you access to the internal components, including the fan, which is the primary focus of this cleaning process.
Removing the outer casing may seem like a daunting task, especially if you are not familiar with the internal structure of your console. However, with the right tools and instructions, it can be a straightforward process. Here’s how you can safely remove the casing:
- Refer to the user manual that came with your PS4 Slim. It should contain detailed instructions on how to remove the outer casing specific to your console model.
- If you no longer have the user manual, don’t worry! There are plenty of online resources available that provide step-by-step guides and video tutorials for removing the casing of various PS4 Slim models.
- Gather the necessary tools, such as a screwdriver or any other specific tools mentioned in the instructions.
- Take your time and follow the instructions carefully to avoid any accidental damage to the console.
By following the appropriate instructions and using the right tools, you can safely remove the outer casing of your PS4 Slim without any hassle. Once the casing is successfully removed, you will have clear access to the fan and other internal components, allowing you to proceed with the cleaning process effectively.
Step-by-Step Guide to Cleaning the PS4 Slim Fan
Now that your PS4 Slim is properly prepared, it’s time to start cleaning the fan. Follow these step-by-step instructions to effectively remove dust and debris from the fan:
Locating the Fan
You will find the fan located inside the PS4 Slim, typically towards the rear of the console. Take a moment to identify the location of the fan before proceeding.
Applying Cleaning Solutions
Using compressed air or a small vacuum cleaner with a brush attachment, carefully blow or suction away any dust or debris that has accumulated on the fan. Be sure to hold the can of compressed air upright to avoid any liquid residue from coming into contact with the fan.
Removing Dust and Debris
After applying the cleaning solution, gently brush away any remaining dust or debris from the fan using a soft brush or cloth. Take your time and ensure that all visible dirt is removed.
Reassembling Your PS4 Slim Post-Cleaning
Once you have thoroughly cleaned the fan, it’s time to reassemble your PS4 Slim. This involves securely attaching the outer casing and restarting the system.
Reattaching the Outer Casing
Carefully align the outer casing with the PS4 Slim and secure it in place using the necessary screws or clips. Make sure that the casing is securely fastened to prevent any loose parts or issues with the system’s performance.
Restarting Your PS4 Slim Safely
After reassembling the PS4 Slim, connect the power cable and any other necessary cables. Press the power button to start the system. Once the system is powered on, check if the fan is running smoothly and quietly. This indicates that the cleaning process was successful and your PS4 Slim is now ready for optimal performance.
By following these steps and regularly cleaning your PS4 Slim fan, you can ensure that your gaming experience remains uninterrupted and that your system performs at its best. Remember to clean the fan periodically to prevent excessive dust buildup and maintain optimal performance for years to come.