
In our daily lives, keyboards have become an essential tool for communication and productivity. Whether we use them for work or leisure, it’s important to keep our keyboards clean to ensure optimal functionality and hygiene. This step-by-step guide will walk you through the process of cleaning your Lush 2 keyboard, highlighting the importance of regular cleaning and providing helpful tips along the way.
Understanding the Importance of Regular Keyboard Cleaning
Keyboards attract a large amount of dust, debris, and bacteria over time. It’s not uncommon for food crumbs, hair, and other particles to find their way between the keys, affecting the keyboard’s performance and potentially posing health risks.
But have you ever wondered how exactly these particles end up on your keyboard? Let’s take a closer look.
Imagine this scenario: you’re sitting at your desk, enjoying a quick snack while working on an important project. A few crumbs fall from your sandwich onto your keyboard, unnoticed. Over time, these tiny food particles accumulate, creating a haven for dust and debris to settle.
Additionally, as you type away, microscopic hair particles from your head and hands are released into the air. Some of these particles inevitably find their way into the gaps between the keys, adding to the keyboard’s collection of unwanted substances.
The Impact of Dust and Debris on Keyboard Functionality
Accumulated dust and debris can hinder the smooth operation of your keyboard. As these particles build up, they can interfere with the key’s movements, causing it to stick or become unresponsive.
Imagine typing an important email or document and suddenly encountering a stubborn key that refuses to cooperate. Frustrating, isn’t it? This is just one of the many inconveniences that can arise from neglecting keyboard cleaning.
But it’s not just about functionality. Dust and debris can also find their way into the delicate mechanisms beneath the keys, potentially causing long-term damage. By regularly cleaning your keyboard, you can prevent these issues and extend the lifespan of your trusty typing companion.
Health Implications of a Dirty Keyboard
A dirty keyboard can harbor harmful bacteria, making it a breeding ground for germs. When we eat at our desks or use our keyboards after handling objects, bacteria can transfer onto the keys, increasing the risk of illnesses.
Think about it: throughout the day, we touch various surfaces, from doorknobs to elevator buttons, that may be contaminated with bacteria. When we then sit down at our desks and start typing, these bacteria hitch a ride on our fingertips and make their way onto the keyboard.
Without regular cleaning, these bacteria can thrive and multiply, posing a potential threat to our health. From the common cold to more serious infections, the consequences of a dirty keyboard can be far-reaching.
So, how can we combat these health risks? The answer is simple: regular keyboard cleaning. By taking a few minutes out of your day to sanitize your keyboard, you can minimize the presence of harmful bacteria and promote a clean and hygienic workspace.
In conclusion, maintaining a clean keyboard is not only crucial for its functionality but also for our own well-being. By understanding the importance of regular keyboard cleaning and implementing it as a part of our routine, we can ensure a healthier and more efficient work environment.
Identifying the Tools Needed for Keyboard Cleaning
Before diving into the cleaning process, it’s important to gather the necessary tools. Here’s what you’ll need:
Cleaning Solutions Suitable for Keyboards
When it comes to choosing the right cleaning solution for your keyboard, opt for alcohol-based or disinfectant wipes. These wipes are specifically designed to effectively remove dirt, grime, and germs from your keyboard without causing any damage. The alcohol content helps to disinfect the surface, ensuring a clean and hygienic keyboard.
It’s crucial to avoid using strong chemicals or abrasive cleaners on your keyboard. These harsh substances can potentially damage the keys or the outer casing, leading to costly repairs or replacements. Always follow the manufacturer’s recommendations for cleaning solutions to ensure the longevity of your keyboard.
Essential Cleaning Equipment
Alongside the appropriate cleaning solution, there are a few essential cleaning equipment items that you’ll need to effectively clean your keyboard.
The first item you’ll need is a microfiber cloth. Microfiber cloths are known for their exceptional ability to attract and trap dust particles without scratching the surface. They are gentle yet effective in removing fingerprints, smudges, and other marks from your keyboard.
Cotton swabs are another handy tool to have. They can be used to reach between the keys and other tight spaces, allowing you to remove stubborn dust and debris that may have accumulated over time. The soft and absorbent nature of cotton swabs makes them perfect for detailed cleaning.
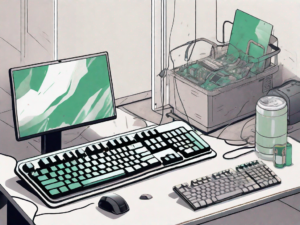
Compressed air canisters are also essential for keyboard cleaning. They provide a powerful burst of air that helps dislodge dirt, crumbs, and other unwanted particles from between the keys. The force of the compressed air ensures a thorough cleaning, leaving your keyboard looking and feeling fresh.
Lastly, a small brush can be useful for removing larger debris from your keyboard. Whether it’s food crumbs or pet hair, a soft-bristled brush can easily sweep away these particles, preparing your keyboard for a deeper clean.
Pre-Cleaning Preparations for Your Lush 2 Keyboard
Safely Disconnecting Your Keyboard
Before starting the cleaning process, it is crucial to ensure the safe disconnection of your Lush 2 keyboard from your computer or device. This step is essential to prevent any accidental damage or interference during the cleaning procedure. Depending on the type of connection your keyboard uses, there are different methods to safely disconnect it.
If your Lush 2 keyboard is connected via a USB cable, gently remove the cable from the USB port of your computer. It is recommended to hold the connector firmly and pull it straight out to avoid any bending or damage to the cable or port. If your keyboard is connected wirelessly through Bluetooth, you will need to turn off the Bluetooth connection on your computer or device. This can usually be done through the settings or control panel.
Assessing the Level of Cleaning Required
Once you have safely disconnected your Lush 2 keyboard, it is time to assess the level of cleaning required. This step will help you determine the appropriate cleaning method and products to use. Take a moment to carefully examine the overall condition of your keyboard.
If your keyboard is only lightly soiled, with minimal visible dirt or grime, a quick surface cleaning might be sufficient. In this case, you can use a soft, lint-free cloth slightly dampened with water or a mild cleaning solution specifically designed for electronic devices. Gently wipe the surface of the keys and the body of the keyboard to remove any dust or fingerprints.
However, if you notice visible stains, spills, or debris trapped between the keys, a more thorough cleaning will be necessary. This could be the result of accidental spills, food crumbs, or accumulated dirt over time. In such cases, a surface cleaning alone will not suffice, and you will need to delve deeper into the cleaning process.
Before proceeding with a thorough cleaning, it is important to note that different keyboards have different designs and structures. Therefore, it is recommended to consult the user manual or manufacturer’s instructions specific to your Lush 2 keyboard model. These guidelines will provide you with detailed information on how to safely clean your keyboard without causing any damage.
By following the proper pre-cleaning preparations, including safely disconnecting your keyboard and assessing the level of cleaning required, you will be well-prepared to embark on the journey of restoring your Lush 2 keyboard to its pristine condition. Remember, a clean keyboard not only enhances its aesthetic appeal but also ensures optimal performance and longevity.
Step-by-Step Cleaning Process
Keeping your keyboard clean is essential for maintaining its functionality and prolonging its lifespan. Regular cleaning not only removes dirt and debris but also helps prevent the spread of germs and bacteria. In this step-by-step guide, we will walk you through the process of cleaning your keyboard thoroughly.
Removing Surface Dust and Debris
Start by gently wiping the keys and the keyboard surface with a microfiber cloth or disinfectant wipes. This initial step helps remove loose dust and debris that may have accumulated on the surface. Use a light touch to avoid accidentally pressing any keys. Pay extra attention to the areas between the keys, as this is where dust and debris tend to accumulate.
As you clean, take a moment to inspect the keys for any sticky residue or stains. If you notice any, you can dampen the cloth or wipes with a mild cleaning solution specifically designed for electronics. However, be cautious not to oversaturate the cloth, as excessive moisture can damage the keyboard.
Deep Cleaning Between the Keys
To remove stubborn debris between the keys, use a small brush or cotton swabs dipped in cleaning solution. Gently scrub the area, applying slight pressure to dislodge any dirt or grime. Take your time and ensure that no moisture seeps into the keyboard, as this can cause malfunctions.
For hard-to-reach areas, such as the corners and crevices between the keys, a can of compressed air can be highly effective. By directing short bursts of air into these spaces, you can dislodge hidden particles and blow them away. Repeat this process until the keys and gaps are free from dirt and grime.
Cleaning the Keyboard Base
Flip your keyboard upside down and gently shake it to dislodge any loose particles that may have fallen between the keys and the base. This step helps remove larger debris that might be trapped in the keyboard. Be careful not to shake it too vigorously, as this can cause damage to the internal components.
Once you have shaken out the loose particles, use compressed air canisters to blow away any remaining dust or debris that might be trapped in the crevices. Hold the canister upright and direct the airflow into the gaps between the keys, ensuring thorough cleaning. Be thorough but cautious to avoid damaging the internal components.
By following this step-by-step cleaning process regularly, you can keep your keyboard in optimal condition. Remember to disconnect the keyboard from the computer before cleaning and allow it to dry completely before reconnecting. With a clean and well-maintained keyboard, you can enjoy a comfortable and hygienic typing experience.
Post-Cleaning Care for Your Lush 2 Keyboard
Drying and Reconnecting Your Keyboard
After completing the cleaning process, ensure that your keyboard is completely dry before reconnecting it to your computer or device. This will prevent any potential damage caused by moisture. Allow sufficient time for the keyboard to air dry or use a soft, absorbent cloth to gently dry the keys.
Regular Maintenance Tips for Your Keyboard
To maintain a clean and functional keyboard, consider implementing these regular maintenance tips:
- Clean your keyboard at least once a month, or more frequently if you notice excessive debris.
- Avoid eating or drinking near your keyboard to minimize the risk of spills and food particles.
- Wash your hands regularly to prevent transferring dirt and bacteria onto the keys.
- Store your keyboard in a clean, dust-free environment when not in use.
- Consider using keyboard covers or protective skins to minimize the entry of dust and debris.
By following these steps and incorporating regular maintenance into your routine, you can keep your Lush 2 keyboard clean, functional, and hygienic. Remember, a clean keyboard not only enhances your typing experience but also contributes to your overall well-being.