
Spinner bearings are crucial components in spinners that allow for smooth and uninterrupted spinning. Over time, these bearings can accumulate dirt, dust, and debris, which can negatively impact their performance. To ensure optimal functionality and enhance the lifespan of your spinners, it is vital to clean the bearings regularly. In this step-by-step guide, we will take you through the process of cleaning spinner bearings effectively and efficiently.
Understanding Spinner Bearings
Before diving into the cleaning process, let’s explore what spinner bearings are and why they need to be cleaned. Spinner bearings are small, metal balls that are housed within the spinner. They are responsible for reducing friction and allowing the spinner to spin smoothly and effortlessly. However, dirt and grime can hinder their performance, leading to decreased spinning time and overall functionality.
What are Spinner Bearings?
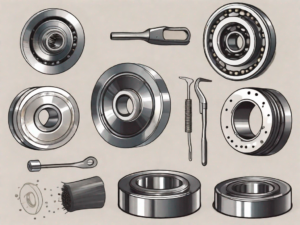
Spinner bearings are typically made of stainless steel and come in various sizes, including 608, which is the most common size found in spinners. They consist of an inner and outer ring with metal balls sandwiched in between. The balls move freely within the track created by the rings, enabling smooth rotation.
These bearings are precision-engineered to ensure minimal friction and maximum spin time. The stainless steel material used in their construction provides durability and corrosion resistance, making them suitable for prolonged use.
Spinner bearings are designed to handle the rotational forces exerted on them during spinning. The balls inside the bearings distribute the load evenly, reducing wear and tear on the spinner and ensuring a longer lifespan for both the bearings and the spinner itself.
Importance of Cleaning Spinner Bearings
Regular cleaning of spinner bearings is crucial for maintaining their performance and increasing their lifespan. When dirt and debris accumulate within the bearings, they can cause friction and impede the smooth rotation of the spinner. This can result in a shorter spin time and decreased enjoyment. By cleaning the bearings, you can remove any obstructions and restore them to their optimal condition.
Over time, the spinner bearings can accumulate various contaminants, such as dust, dirt, and even oils from your hands. These contaminants can create a layer of grime that hampers the free movement of the balls within the bearings. As a result, the spinner may start to feel sluggish and not spin as smoothly as before.
By regularly cleaning your spinner bearings, you can prevent the build-up of dirt and grime. This not only ensures optimal performance but also extends the lifespan of the bearings. Cleaning the bearings removes any debris that could potentially cause damage or wear down the components over time.
Furthermore, cleaning the spinner bearings allows you to inspect them for any signs of damage or wear. This proactive approach enables you to identify and address any issues early on, preventing further damage to the bearings or the spinner itself.
It is important to note that different spinners may have different methods of accessing and removing the bearings for cleaning. Some spinners have removable caps or covers, while others may require disassembly. Always refer to the manufacturer’s instructions or seek guidance from experienced users to ensure you clean the spinner bearings correctly and avoid any accidental damage.
In conclusion, understanding spinner bearings and the importance of cleaning them is essential for maintaining the optimal performance and longevity of your spinner. Regular cleaning removes dirt and debris that can hinder the smooth rotation of the spinner, ensuring a longer spin time and overall functionality. So, take the time to clean your spinner bearings and enjoy a satisfying spinning experience!
Gathering the Necessary Cleaning Materials
Before embarking on the cleaning process, it is essential to gather all the necessary cleaning materials. Having the right supplies will ensure that you can effectively clean your items and maintain their quality. Here is a list of items you will need:
List of Cleaning Supplies
- A small container or bowl: This will serve as a convenient place to hold your cleaning solution and keep everything organized. Make sure it is clean and free of any contaminants before use.
- Isopropyl alcohol (preferably 99% concentration): Isopropyl alcohol is a versatile cleaning agent that is commonly used to clean various surfaces. It is effective in removing dirt, grime, and oils. Opting for a higher concentration will ensure better cleaning results.
- Clean cotton swabs or toothbrush: These tools are essential for reaching small crevices and corners that may accumulate dirt or debris. The soft bristles of a toothbrush or the precision of cotton swabs can help you achieve a thorough cleaning.
- Lint-free cloth or paper towels: To dry and polish your items after cleaning, it is crucial to have a lint-free cloth or paper towels. Lint can leave unwanted residue, so using a cloth that does not shed fibers will ensure a clean and pristine finish.
- Lubricant (preferably a light oil such as sewing machine oil): After cleaning, it is important to lubricate certain parts to maintain their functionality and prevent rust or corrosion. Using a light oil, such as sewing machine oil, will provide adequate lubrication without attracting excessive dirt or dust.
Where to Purchase Cleaning Supplies
Now that you know what cleaning supplies you need, you may be wondering where to find them. Fortunately, cleaning supplies are readily available at various retailers, catering to different preferences and budgets. Here are a few options:
Hardware stores: Local hardware stores often carry a wide range of cleaning supplies. They are a convenient option if you prefer to see the products in person before purchasing. The knowledgeable staff can also provide guidance on the best cleaning materials for your specific needs.
Online marketplaces: Online shopping platforms offer a vast selection of cleaning supplies, allowing you to compare prices, read reviews, and conveniently have the items delivered to your doorstep. Popular online marketplaces have a wide range of options, ensuring you can find the specific cleaning supplies you require.
Specialized spinner shops: If you have specific cleaning needs for items such as spinners or bearings, specialized spinner shops may be your best bet. These stores cater to enthusiasts and offer a variety of cleaning supplies specifically designed for spinners and similar items. The staff at these shops are often knowledgeable about the products and can provide expert advice.
When purchasing isopropyl alcohol, it is important to ensure that the concentration is high enough to effectively remove dirt and grime from the bearings. This will help you achieve optimal cleaning results and maintain the performance of your items.
Pre-Cleaning Steps for Spinner Bearings
Before diving into the cleaning process, it is essential to take some pre-cleaning steps to ensure a smooth and safe experience.
When it comes to spinner bearings, proper pre-cleaning steps can make all the difference in maintaining their performance and longevity. By following these steps, you can ensure that your spinner bearings are thoroughly cleaned and ready for optimal spinning.
Safety Measures to Consider
Before you begin the cleaning process, it is important to consider some safety measures to protect yourself and ensure a safe cleaning experience.
First and foremost, it is highly recommended to wear gloves while cleaning spinner bearings. This not only protects your hands from any potential skin irritation caused by the cleaning solution but also prevents any contamination from oils or dirt on your hands.
In addition to wearing gloves, it is crucial to clean your work area thoroughly. Remove any debris or clutter that may interfere with the cleaning process. Ensure that your work area is well-ventilated to prevent any inhalation of fumes from the cleaning solution.
Furthermore, it is important to have the necessary tools and materials readily available before you start cleaning. This includes a suitable cleaning solution, a soft brush or toothbrush for scrubbing, and a clean, lint-free cloth for drying.
Preparing Your Work Area
Once you have taken the necessary safety measures, it is time to prepare your work area for the cleaning process.
Start by laying down a clean and soft cloth on your work surface. This will not only protect the spinner from any scratches or damage but also prevent any small components, such as bearings or spacers, from getting lost during the cleaning process.
Next, ensure that you have ample lighting in your work area. Proper lighting is crucial to spot any dirt or grime that may be hidden within the spinner bearings. This will help you clean the bearings more effectively and ensure that no residue is left behind.
Lastly, make sure that you have enough space to comfortably work on your spinner bearings. Having enough space will allow you to maneuver the spinner and access all the necessary areas for cleaning. It will also prevent any accidental spills or mishaps during the cleaning process.
By taking these pre-cleaning steps, you are setting yourself up for a successful cleaning process. Not only will your spinner bearings be thoroughly cleaned, but you will also ensure a safe and enjoyable experience throughout the entire process.
Detailed Cleaning Process
Now that you have gathered the necessary materials and prepared your work area, let’s delve into the detailed cleaning process for spinner bearings.
Removing the Bearings
Start by removing the spinner bearings from the spinner. This can be done by carefully unscrewing the caps or using a small tool, such as tweezers or a toothpick, to pop them out. Be gentle and avoid using excessive force to prevent any damage to the spinner or the bearings.
Applying the Cleaning Solution
Once the bearings are removed, pour a small amount of isopropyl alcohol into the container or bowl. Gently place the bearings into the alcohol, ensuring they are completely submerged. Let them soak for a few minutes to loosen and dissolve any dirt or debris.
Scrubbing and Rinsing the Bearings
After the soaking period, take a clean cotton swab or toothbrush and gently scrub the bearings, paying close attention to all the nooks and crannies. This will help dislodge any remaining dirt or grime. Once scrubbed, rinse the bearings in clean water to remove any traces of alcohol or cleaning solution. Pat them dry with a lint-free cloth or paper towels.
Post-Cleaning Steps
After successfully cleaning the spinner bearings, it is essential to follow a few post-cleaning steps to ensure their longevity and optimal performance.
Drying the Bearings
Before reassembling the spinner, make sure the bearings are completely dry. Leaving any moisture can lead to rust or damage the bearings. Allow them to air dry completely or use a hairdryer on low heat to speed up the process. Ensure they are completely dry before moving on to the next step.
Reassembling the Spinner
Once the bearings are dry, carefully reassemble the spinner by placing the bearings back into their designated slots. Use the same technique you used to remove them, whether it is screwing the caps back on or gently popping them into place. Ensure they are secure and fit snugly before testing the spinner.
With these step-by-step instructions, you can effectively clean your spinner bearings and prolong their lifespan. Regular maintenance and cleaning will not only improve the efficiency and performance of your spinner but also enhance your overall spinning experience. So, grab your cleaning supplies and get ready to enjoy a smoother and longer spin with your trusty spinner.