
Is your Razer Ornata covered in dust or in need of a good cleaning? You’ve come to the right place. This guide will show you how to deep clean your Razer keyboard so it feels like the day you pulled it out of the box.
How to clean Razer Ornata
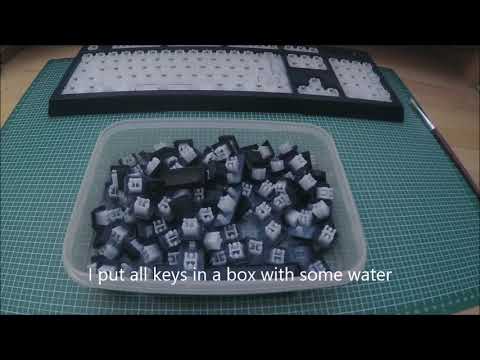
Remove the keys from your Razer Ornata. Using a 1:1 water/isopropyl solution and a damp q-tip, clean all of the hard to reach areas throughout the keyboard. After the keyboard is dry, re-install all of the keys. Now your keyboard should be ready to use again!
Challenges of cleaning mechanical keyboard
It’s important to keep your keyboard clean because dust, dirt and other particles can accumulate on your keyboard and cause it to malfunction. The keys on a mechanical keyboard are closer together than those on a regular keyboard so they tend to attract more dirt and dust in the cracks. If you don’t take care of your mechanical keyboard, it will start to accumulate dirt and dust faster than a regular keyboard.
So let’s find out how we can clean our Razer Ornata!
How to remove keys from mechanical keyboard
Mechanical keyboards are the most popular type of keyboard. They have the most satisfying tactile feedback, and they’re often built to last. But, like any other keyboard, it will eventually need cleaning.
The first step is to turn off your computer and unplug all of the cables from your computer. Make sure you save any work you may have open on your computer before continuing with this guide.
Next, remove the key caps from each key on your keyboard by pulling them straight up or using a key removal tool for stubborn keys that may be stuck in place. Checkout this guide for removing keycaps. They should pop straight off, but you want to make sure not to damage your keyboard in the process. Although this is the best way to clean your keyboard, it is important to note that Razer does not recommend removing the keycaps.
How to clean Razer Ornata Chroma
Now that the keys are removed, you can clean the keyboard thoroughly. If your keyboard simply needs a light cleaning, this is the best method for you. Whether you have the standard version or the Chroma version, this cleaning method applies.
Using a 1:1 water/isopropyl solution and a damp q-tip, clean all of the hard to reach areas throughout the keyboard. After the keyboard is dry, re-install all of the keys. Now your keyboard should be ready to use again!
How to clean Razer Ornata (Deep Cleaning Method)
If your Razer Ornata is particularly dirty or you want to perform a maintenance cleaning to the get the most life out of your keyboard, this method is going to be for you. As a general warning, it is slightly more involved than the previous method.
- Remove the individual keys using the method above. Again, this isn’t too hard, but you do want to make sure you do not damage your keyboard in the removal process.
- Next, you need to locate and remove the screws. There are 16 screws in total. You can find four under the rubber corner triangles and the rest are under the circle stickers that seem like they are part of the back plate. The triangles might be hard to remove but with some prying they should come off. Set them in a safe place with the sticky side up for easy reinstallation after the cleaning.
- Now, on to the circle stickers. Warning: if you remove the circle stickers, it is nearly impossible to reinstall them because you will ruin them during the removal process. But, if you want to remove the back plate this is the only way. Use a small flathead screw driver to remove the stickers.
- Now, you should see the remaining screws. Remove the screws and keep the separated in different groups, like so:
- 4 Corners
- 4 Middle
- 4 Closest to top
- 4 Closest to the bottom.
- At this point, you should be able to remove the backplate. Find the bottom of the keyboard and you should see it coming apart slightly since the screws are no longer holding it tight. Run your finger from the center to the outside until the two plates pop apart.
- Another warning: do not move the membrane (the squishy stuff!).
- Take the front half of the keyboard and separate it. At this point there’s only the lights in the display that tells you if caps lock is on, so you can scrub/wash without fear as long as you don’t get that wet.
- Lightly wash the membrane with damp fabric
- Step 7: All the keyboard to full dry and put it back together.