
Leather motorcycle gloves are an essential piece of gear for any rider, providing protection and grip while enhancing the overall riding experience. However, over time, these gloves can become dirty and worn, diminishing their effectiveness and longevity. That’s why it’s crucial to clean and maintain them regularly. In this step-by-step guide, we will delve into the importance of cleaning your leather motorcycle gloves, the necessary supplies you’ll need, pre-cleaning steps, the detailed cleaning process, and post-cleaning care.
Understanding the Importance of Cleaning Leather Motorcycle Gloves
Properly cleaning your leather motorcycle gloves not only enhances their appearance but also contributes to their overall performance and durability. Neglecting to clean your gloves can have several negative consequences.
The Impact on Glove Longevity
Regularly cleaning your leather motorcycle gloves can significantly extend their lifespan. By removing dirt, dust, and grime, you prevent them from infiltrating the leather and breaking down its fibers. This helps maintain the structural integrity of the gloves, preventing premature wear and tear.
Imagine riding your motorcycle on a dusty road, with debris flying in the air. Without proper cleaning, these particles would settle on your gloves, gradually causing abrasion and weakening the leather. However, by diligently cleaning your gloves after each ride, you create a barrier against these harmful elements, ensuring your gloves remain in top condition for years to come.
Health Implications of Dirty Gloves
Dirty gloves can harbor bacteria, sweat, and other contaminants that can lead to unpleasant odors and skin irritations. Regular cleaning not only keeps your gloves fresh and odor-free but also ensures a hygienic barrier between your hands and the elements.
Consider the sweat that accumulates on your hands during a long ride. If left uncleaned, this moisture can seep into the leather, creating a breeding ground for bacteria. Over time, this can result in foul-smelling gloves and potential skin infections. By taking the time to clean your gloves, you eliminate these risks, keeping your hands clean and healthy.
Maintaining Optimal Glove Performance
As you ride, your leather motorcycle gloves are exposed to various environmental factors, such as rain, sun, and dirt. These elements can gradually degrade the glove’s performance, affecting its grip and flexibility. Cleaning your gloves helps remove residue and restore their original functionality.
Imagine riding in the rain, with water droplets splashing onto your gloves. Without proper cleaning, these droplets can leave behind residue that affects the glove’s ability to provide a secure grip on the handlebars. Additionally, exposure to the sun’s UV rays can cause the leather to dry out and become stiff, reducing flexibility. However, by regularly cleaning your gloves, you remove these residues and restore their grip and flexibility, ensuring optimal performance during your rides.
Remember, taking care of your leather motorcycle gloves is not just about aesthetics. It is about preserving their longevity, maintaining your health, and ensuring optimal performance. So, make it a habit to clean your gloves after each ride, and enjoy the benefits of well-maintained gear.
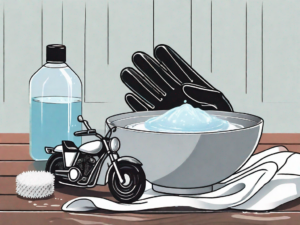
Gathering the Necessary Cleaning Supplies
Before you embark on the cleaning process, it’s essential to gather all the necessary supplies. Here are the key items you’ll need:
When it comes to cleaning leather motorcycle gear, using the right leather cleaner is crucial to avoid damaging the material. Look for cleaners specifically formulated for leather motorcycle gear. These cleaners are designed to remove dirt and stains without compromising the integrity of the leather.
But how do you identify a suitable leather cleaner? Well, it’s important to consider a few factors. Firstly, check the label to ensure that the cleaner is specifically designed for leather. Some cleaners may claim to work on multiple surfaces, but it’s always best to choose one that is specifically formulated for leather.
Secondly, take a look at the ingredients. Avoid cleaners that contain harsh chemicals or solvents, as these can strip away the natural oils in the leather and cause it to dry out or crack. Instead, opt for cleaners that are gentle and nourishing, containing ingredients like lanolin or natural oils.
Lastly, consider the reputation of the brand. Look for reviews or recommendations from other motorcycle enthusiasts who have used the cleaner before. This can give you a better idea of its effectiveness and whether it’s worth investing in.
Essential Tools for Cleaning Leather Gloves
In addition to a suitable leather cleaner, you’ll need a few basic tools to effectively clean your leather gloves:
- A soft, clean cloth or sponge: This will be your main tool for applying the cleaner and gently scrubbing away dirt and stains. Make sure the cloth or sponge is clean and free from any debris that could scratch the leather.
- A small brush with soft bristles: A brush with soft bristles can be used to gently scrub hard-to-reach areas or areas with stubborn dirt or stains. Be careful not to apply too much pressure or use a brush with stiff bristles, as this can damage the leather.
- A bowl of warm water: Warm water can be used to dampen the cloth or sponge before applying the cleaner. It helps to activate the cleaning agents and makes it easier to remove dirt and stains. Make sure the water is not too hot, as excessive heat can also damage the leather.
Now that you have gathered all the necessary cleaning supplies and tools, you are ready to start the cleaning process. Remember to read and follow the instructions on the leather cleaner carefully, and always test it on a small, inconspicuous area of the leather before applying it to the entire surface. With the right supplies and techniques, you can keep your leather motorcycle gear looking clean and well-maintained for years to come.
Pre-Cleaning Steps for Leather Motorcycle Gloves
Prior to diving into the actual cleaning process, there are a couple of steps you should follow to ensure the best results:
Checking the Manufacturer’s Instructions
Begin by consulting the manufacturer’s instructions or any care tags attached to your leather gloves. Some gloves may have specific cleaning requirements or limitations that you need to be aware of.
For example, certain leather gloves may be treated with special coatings or finishes that require specific cleaning products or techniques. By following the manufacturer’s instructions, you can avoid using any cleaning agents that may damage or discolor the leather.
Additionally, the manufacturer’s instructions may provide guidance on how often the gloves should be cleaned and any recommended maintenance routines to keep them in optimal condition.
Preparing the Gloves for Cleaning
Prepare your gloves by gently wiping off any loose dirt or debris using a soft cloth or brush. This step helps to prevent the dirt from spreading and further embedding itself into the leather during the cleaning process.
While wiping off the dirt, take the opportunity to inspect the gloves for any signs of damage or wear. Look for areas where the stitching may be coming undone or any tears in the leather. Identifying these issues early on can help you address them before they worsen.
Furthermore, if you notice any stains or spots on the gloves, make a mental note of their location. This will allow you to pay extra attention to those areas during the cleaning process.
Once the loose dirt and debris have been removed, you can proceed with the actual cleaning of your leather motorcycle gloves.
Detailed Step-by-Step Cleaning Process
Keeping your leather motorcycle gloves clean not only helps maintain their appearance but also extends their lifespan. Follow this detailed step-by-step cleaning process to ensure your gloves stay in top condition.
Applying the Cleaning Solution
Now that your gloves are prepped, it’s time to start the cleaning process. Begin by dampening a clean cloth or sponge with warm water. This will help loosen any surface dirt or grime. Take a moment to appreciate the supple texture of the leather as you prepare to restore its natural beauty.
Once your cloth or sponge is damp, apply a small amount of the leather cleaner onto it. Choose a cleaner specifically formulated for leather, as it will effectively remove dirt without causing damage. Gently rub the cleaning solution into the surface of the gloves, using circular motions. Take your time and enjoy the therapeutic rhythm of the cleaning process.
As you work the cleaner into the leather, you may notice some stains or areas that require extra attention. Don’t worry; we have a solution for that too.
Proper Techniques for Scrubbing and Wiping
Next, take the small brush with soft bristles and use it to scrub any stubborn stains or areas that require extra attention. Be gentle yet thorough in your scrubbing, ensuring not to damage the leather. The soft bristles of the brush will effectively lift away dirt and grime without causing any harm.
As you scrub, take a moment to appreciate the craftsmanship of your gloves. Leather motorcycle gloves are not just a protective accessory; they are a symbol of your passion for riding and your commitment to safety.
After you have thoroughly scrubbed the gloves, it’s time to wipe away the cleaning solution and any loosened dirt. Use a clean, damp cloth to gently remove the residue. Take your time and ensure that you have wiped away all traces of the cleaner. Your gloves will thank you for the extra care.
Drying Your Gloves Correctly
After cleaning, it’s important to dry your leather motorcycle gloves properly. This step is crucial to prevent any damage to the leather and maintain their shape.
Avoid exposing your gloves to direct sunlight or high heat sources, as these can cause the leather to crack or shrink. Instead, allow your gloves to air dry at room temperature. Find a well-ventilated area where they can peacefully dry, undisturbed.
During the drying process, you can stuff your gloves with soft materials, such as newspaper or towels. This will help them maintain their shape and prevent any creases from forming. Take a moment to appreciate the beauty of your gloves as they dry, knowing that you have taken the necessary steps to care for them.
Once your gloves are completely dry, they will be ready to accompany you on your next thrilling motorcycle adventure. Remember, regular cleaning and proper maintenance are essential to keep your leather motorcycle gloves looking their best and providing you with the protection you need.
Post-Cleaning Care for Leather Motorcycle Gloves
Conditioning Your Gloves
Conditioning your leather motorcycle gloves is an essential step in keeping them supple, preventing them from drying out, and maintaining their longevity. Apply a small amount of leather conditioner to a clean cloth and gently massage it into the surface of the gloves. Allow the conditioner to penetrate the leather for the recommended time stated on the product label. Wipe off any excess conditioner with a clean, dry cloth.
Storing Your Gloves After Cleaning
After cleaning and conditioning your leather motorcycle gloves, proper storage is crucial to ensure they remain in excellent condition. Store them in a cool, dry place away from direct sunlight. Avoid folding or creasing them, as this can lead to permanent damage. If possible, hang your gloves or use a glove drying rack to maintain their shape and allow for proper air circulation.
By following these step-by-step cleaning techniques and implementing post-cleaning care, you’ll be able to effectively clean and maintain your leather motorcycle gloves, keeping them in optimal condition for many rides to come.