
Cleaning the heatsink of your PS4 Pro is an essential maintenance task that should be performed regularly. A clean heatsink not only ensures optimal performance but also prevents overheating, which can lead to system errors and potential damage. In this step-by-step guide, we will walk you through the process of cleaning your PS4 Pro heatsink, providing valuable insights along the way to keep your gaming experience smooth and uninterrupted.
Understanding the Importance of a Clean Heatsink
A heatsink plays a crucial role in the cooling system of a PS4 Pro. It is responsible for dissipating heat generated by the internal components, such as the CPU and GPU. Over time, dust and debris buildup on the heatsink can obstruct airflow, reducing its efficiency and causing the system to overheat.
The Role of a Heatsink in a PS4 Pro
The primary function of a heatsink is to absorb the heat generated by the internal components and transfer it away from them. This ensures that the components remain within their optimal operating temperature range. A clean heatsink allows for efficient heat transfer, preventing any potential performance issues or system shutdowns.
Let’s dive deeper into how a heatsink works. When the CPU and GPU of your PS4 Pro are in use, they generate a significant amount of heat. This heat needs to be dissipated to prevent the components from overheating, which can lead to performance degradation or even permanent damage. This is where the heatsink comes into play.
The heatsink is typically made of metal, such as aluminum or copper, due to their excellent thermal conductivity. It consists of fins or ridges that increase the surface area available for heat dissipation. The heatsink is in direct contact with the CPU and GPU, allowing it to absorb the heat generated by these components.
Once the heatsink absorbs the heat, it needs to transfer it away from the components. This is where another crucial component comes into play: the fan. The fan blows air over the heatsink, carrying away the heat and cooling the metal fins. This process is known as convective cooling.
Now, imagine what happens when the heatsink becomes dirty or clogged with dust and debris. The airflow over the heatsink becomes restricted, hindering the convective cooling process. As a result, the heatsink’s efficiency decreases, and it struggles to transfer heat away from the components effectively.
Consequences of a Dirty Heatsink
If left neglected, a dirty heatsink can have severe consequences for your PS4 Pro’s performance. The increased temperature can cause the system to throttle, resulting in decreased performance and potential crashes during gameplay. Moreover, excessive heat can also lead to long-term damage to the internal components, reducing the lifespan of your console.
When the heatsink is dirty, the airflow is impeded, and the heat transfer process becomes inefficient. As a result, the temperature of the CPU and GPU rises, exceeding their optimal operating range. To prevent permanent damage, the system automatically reduces the performance of these components, known as throttling. This reduction in performance can lead to laggy gameplay, frame rate drops, and overall diminished gaming experience.
Furthermore, the increased temperature can cause the solder joints connecting the components to the motherboard to weaken or even melt. This can result in intermittent connectivity issues or complete failure of the components. Over time, the constant exposure to high temperatures can significantly reduce the lifespan of your PS4 Pro.
It’s important to note that a dirty heatsink not only affects the performance and lifespan of your console but also increases the risk of overheating-related failures. Excessive heat can cause the system to shut down abruptly, potentially causing data loss or corruption.
To ensure optimal performance and longevity of your PS4 Pro, regular maintenance and cleaning of the heatsink are essential. By keeping the heatsink clean and free from dust and debris, you can maximize the cooling efficiency, prevent performance issues, and prolong the lifespan of your beloved gaming console.
Gathering the Necessary Cleaning Tools
Before you begin cleaning your PS4 Pro heatsink, it’s crucial to gather the necessary tools. Having the right tools on hand will make the cleaning process easier and more efficient.
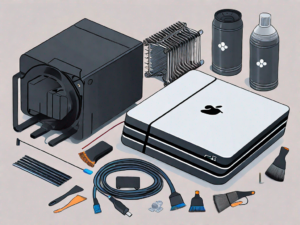
When it comes to cleaning your PS4 Pro heatsink, being prepared with the right tools is essential. The following is a list of tools that you will need:
List of Tools Needed
- Large Phillips screwdriver
- Cotton swabs
- Isopropyl alcohol
- Canned air or an air compressor
- Microfiber cloth
Each of these tools plays a crucial role in ensuring that your cleaning process goes smoothly. Let’s take a closer look at each one:
- Large Phillips screwdriver: This tool will be used to remove the screws that secure the PS4 Pro’s casing. It’s important to have a large Phillips screwdriver to ensure a secure grip and prevent any damage to the screws or the console itself.
- Cotton swabs: These small, absorbent tools are perfect for reaching tight spaces and removing dust and debris. They are particularly useful for cleaning the delicate components of the heatsink.
- Isopropyl alcohol: Isopropyl alcohol is a common cleaning agent used for electronics. It evaporates quickly, leaving no residue behind. It’s perfect for cleaning the heatsink and other internal components of your PS4 Pro.
- Canned air or an air compressor: Dust can accumulate inside your PS4 Pro’s heatsink, affecting its performance. Canned air or an air compressor can help you blow away the dust and debris, ensuring optimal airflow and preventing overheating.
- Microfiber cloth: A microfiber cloth is an essential tool for cleaning the exterior of your PS4 Pro. It is soft and gentle, preventing scratches or damage to the console’s surface. It’s also highly absorbent, making it perfect for wiping away fingerprints and smudges.
Safety Precautions When Handling Tools
Remember to prioritize safety when handling tools. Ensure that your console is unplugged and turned off before beginning any cleaning activities. This will protect both you and your console from unnecessary accidents.
Additionally, it’s important to handle tools with care to avoid any injuries. Always use tools as intended and avoid applying excessive force. If you encounter any difficulties or are unsure about how to use a specific tool, consult the manufacturer’s instructions or seek guidance from a professional.
By following these safety precautions, you can ensure a smooth and accident-free cleaning process for your PS4 Pro heatsink.
Preparing Your PS4 Pro for Cleaning
Before diving into the cleaning process, it’s essential to prepare your PS4 Pro. Following these steps will ensure a safer and more efficient cleaning experience.
Safely Unplugging and Cooling Down Your PS4 Pro
Start by securely unplugging all cables from your PS4 Pro and moving it to a clear, well-ventilated space. Allow the console to cool down for at least 30 minutes before proceeding. This will minimize the risk of burns and ensure that the internal components are safe to handle.
While your PS4 Pro is cooling down, take a moment to appreciate the sleek design of the console. The matte finish and angular edges give it a modern and sophisticated look that complements any gaming setup. The iconic PlayStation logo on the top adds a touch of nostalgia and reminds you of the countless hours of gaming enjoyment that await you.
As you wait for the console to cool down, you may find yourself reminiscing about the memorable gaming moments you’ve had on your PS4 Pro. Whether it’s exploring vast open worlds, defeating challenging bosses, or competing against friends in multiplayer battles, your PS4 Pro has been your gateway to unforgettable gaming experiences.
Removing the PS4 Pro Outer Shell
Once the console has sufficiently cooled down, it’s time to remove the outer shell. Using a large Phillips screwdriver, carefully remove the screws located at the back of the console. Gently lift the shell to reveal the internal components.
As you remove the screws, you can’t help but admire the engineering that went into designing the PS4 Pro. The precision and attention to detail are evident in every aspect of the console’s construction. From the seamless integration of the buttons and ports to the sturdy build that ensures durability, the PS4 Pro is a testament to Sony’s commitment to quality.
With the outer shell removed, you get a glimpse of the intricate components that power your gaming adventures. The cooling fan, the power supply unit, and the motherboard are just a few of the essential parts that work together to deliver the stunning graphics and immersive gameplay you love.
Take a moment to appreciate the complexity of the internal components. Each one plays a crucial role in ensuring that your PS4 Pro runs smoothly and efficiently. The cooling fan keeps the system from overheating, the power supply unit provides the necessary electricity, and the motherboard acts as the central hub, connecting all the different parts together.
Now that you have successfully prepared your PS4 Pro for cleaning and have gained a deeper appreciation for its design and components, it’s time to move on to the next steps of the cleaning process. By following the proper cleaning techniques, you can keep your PS4 Pro in optimal condition and continue to enjoy the thrilling world of gaming it offers.
Accessing the Heatsink
With the outer shell removed, you can now access the heatsink of your PS4 Pro. Taking the necessary precautions, find and prepare the heatsink for cleaning.
Locating the Heatsink
The heatsink is usually located near the center of the console, beneath the fan assembly. It is a metal structure with fins designed to dissipate heat effectively. Take note of its location to ensure you clean the correct component.
Steps to Reach the Heatsink
Before cleaning the heatsink, you may need to remove other components obstructing access. These can include dust covers, cables, or plastic clips. Take your time to identify and remove any such components, creating a clear path to the heatsink.
Cleaning the Heatsink
Now that you have located the heatsink and prepared the area, it’s time to start the cleaning process.
Detailed Cleaning Process
Begin by gently blowing compressed air or using an air compressor to remove loose dust and debris from the heatsink fins. Take care not to blow the dust further into your console as this may lead to other issues.
Next, dampen a cotton swab with isopropyl alcohol. Gently wipe the heatsink fins in a back-and-forth motion, removing any stubborn dirt or grime. Avoid applying excessive pressure to prevent damage to the heatsink.
For deeper cleaning, you can combine compressed air with the isopropyl alcohol. Spray a small amount of alcohol onto the heatsink fins and use the compressed air to blow away the loosened debris. Repeat this process until the heatsink is thoroughly cleaned.
Tips for Effective Cleaning
- Take your time while cleaning to ensure thoroughness and prevent accidental damage.
- Ensure the console is completely dry before reassembling to avoid potential damage.
- Regularly clean your PS4 Pro heatsink to maintain optimal performance and prolong its lifespan.
By following these step-by-step instructions and taking necessary precautions, you can keep your PS4 Pro heatsink clean and maintain its performance over time. Cleaning your heatsink regularly will help ensure a seamless gaming experience while preventing any potential overheating issues. Take care of your console, and it will continue to serve you well for years to come.