
Grinders are essential tools for cannabis enthusiasts, allowing for the quick and efficient breakdown of buds. However, over time, grinders can become clogged with resin and debris, impacting their performance and the quality of the ground herb. In this article, we will explore the importance of regular grinder cleaning, identify the right tools for the job, provide a step-by-step guide to cleaning your grinder, discuss techniques for extracting hash from your grinder, and offer post-cleaning maintenance tips.
Understanding the Importance of Regular Grinder Cleaning
A clean grinder is crucial for optimal performance, ensuring smooth and even grinding. Let’s dive deeper into the impact of a dirty grinder on its performance and the potential health implications.
When it comes to grinding your favorite herb, having a clean grinder is essential. Not only does it enhance the overall experience, but it also ensures that you get the most out of your herb. A dirty grinder, on the other hand, can have a negative impact on both performance and health.
The Impact on Grinder Performance
A dirty grinder can hinder its ability to grind effectively. The buildup of resin and debris can cause the grinding mechanism to become stiff and less efficient. As a result, grinding becomes a tedious task, requiring more effort and time. The once smooth and effortless motion turns into a struggle, affecting the quality of the grind.
Uneven grinding is another issue that arises from a dirty grinder. The accumulation of residue can create obstacles, preventing the herb from being evenly shredded. This can lead to larger chunks of herb, making it difficult to roll a joint or pack a bowl evenly. The inconsistency in grind size can also affect the flavor and potency of your herb.
Furthermore, a dirty grinder can cause the herb to get stuck in the teeth or the screen, resulting in clogs and blockages. This not only adds frustration to the grinding process but also reduces the overall efficiency of the grinder.
Health Implications of a Dirty Grinder
Aside from affecting performance, a dirty grinder can also pose health risks. Over time, microbes and bacteria can accumulate in the grinder’s chamber, potentially contaminating your herb. These microorganisms thrive in warm and moist environments, finding the perfect breeding ground in a neglected grinder.
When you consume herb that has been in contact with a dirty grinder, you expose yourself to these harmful pathogens. This can lead to various health issues, including respiratory infections, gastrointestinal problems, and even allergic reactions. Cleaning your grinder regularly helps ensure you’re consuming clean and safe cannabis, minimizing the risk of contamination.
Moreover, a clean grinder also prevents the transfer of flavors and odors from previous grinds. If you enjoy different strains of herb, it’s important to keep your grinder clean to avoid mixing flavors. A dirty grinder can leave behind residues that can alter the taste and aroma of your herb, affecting your overall experience.
In conclusion, regular grinder cleaning is vital for maintaining optimal performance and ensuring a safe and enjoyable herb consumption experience. By keeping your grinder clean, you not only enhance its efficiency but also protect your health from potential contaminants. So, make it a habit to clean your grinder regularly to reap the benefits of a clean and efficient grind every time.
Identifying the Right Tools for Grinder Cleaning
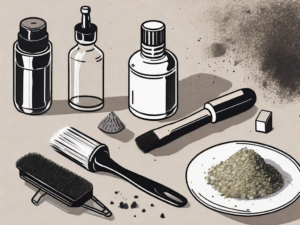
Before diving into the cleaning process, it’s important to gather the necessary tools. Fortunately, you don’t need any specialized equipment to effectively clean your grinder. Let’s explore common household items and specialized cleaning tools that can aid in the cleaning process.
When it comes to cleaning your grinder, having the right tools can make all the difference. While some may opt for a quick wipe down with a cloth, taking the time to properly clean your grinder can help maintain its performance and extend its lifespan.
One common household item that can be used for grinder cleaning is a toothbrush. Its bristles are perfect for reaching those hard-to-reach areas and removing stubborn residue. Simply dip the toothbrush in warm water and gently scrub away any buildup.
Another household item that can be used is dish soap. When mixed with warm water, dish soap offers a gentle yet effective cleaning solution. It helps to break down oils and residue, leaving your grinder looking and smelling fresh.
For those looking for an extra level of cleanliness, isopropyl alcohol can be used to disinfect the grinder thoroughly. This can be particularly useful if you use your grinder to grind herbs or spices that may leave behind bacteria or other contaminants.
Specialized Cleaning Tools
While common household items can get the job done, there are also specialized cleaning tools available for those who prefer a more targeted approach. Grinder cleaning kits, for example, are specifically designed to make the cleaning process more convenient and efficient.
These kits often include brushes with bristles of varying sizes, allowing you to reach every nook and cranny of your grinder. The brushes are designed to effectively remove residue without scratching or damaging the grinder’s surfaces.
In addition to brushes, cleaning solutions are often included in these kits. These solutions are specially formulated to break down oils, residue, and other buildup, making it easier to clean your grinder. Some solutions even have antibacterial properties, ensuring a thorough and hygienic cleaning.
Furthermore, specialized cleaning tools may also include other accessories such as scraper tools or picks. These can be particularly useful for removing compacted residue or hard-to-reach particles.
While not necessary, investing in a grinder cleaning kit can save you time and effort in the long run. These kits are designed to provide everything you need for a thorough cleaning, ensuring that your grinder remains in optimal condition.
Step-by-Step Guide to Cleaning Your Grinder
Now that you have your tools ready, let’s walk through the step-by-step grinder cleaning process. Remember, it’s crucial to take your time and be thorough to ensure a pristine and fully functioning grinder.
Pre-Cleaning Preparations
Start by disassembling your grinder, carefully removing each component. Place the components on a clean towel or paper towel to prevent any mess. Now, let’s move on to the detailed cleaning process.
Detailed Cleaning Process
1. Use a toothbrush to gently scrub each grinder component, focusing on removing resin and debris buildup. The toothbrush bristles will help dislodge any stubborn residue, ensuring a thorough clean. Take your time to ensure all surfaces are properly scrubbed.
2. For particularly stubborn residue, you can apply a small amount of dish soap or isopropyl alcohol. These cleaning agents will help break down the buildup, making it easier to remove. Be sure to use a gentle touch and rinse the components thoroughly afterward to remove any traces of the cleaning agents.
3. Rinse each component thoroughly under warm running water, ensuring all cleaning agents are completely removed. Pay close attention to any crevices or hard-to-reach areas, as residue can often accumulate in these spots. Use your fingers to help dislodge any remaining debris.
4. For a deep clean, you can soak the grinder components in isopropyl alcohol for a few minutes. This will help dissolve any remaining resin or buildup that may be difficult to remove through scrubbing alone. Ensure that all components are fully submerged in the alcohol and gently agitate them to loosen any stubborn residue.
5. After soaking, give each component a final rinse under warm water. It’s important to remove all traces of alcohol before using the grinder again, as it can affect the flavor and quality of your herbs or spices. Take your time to ensure that all alcohol is thoroughly rinsed off.
6. Once all components are clean and dry, it’s time to reassemble your grinder. Take a moment to appreciate your sparkling clean tool before moving on to the next step. Ensure that each component is properly aligned and securely fastened to avoid any issues during use.
7. Finally, before using your grinder, it’s a good idea to give it a quick test run to ensure everything is functioning smoothly. Grind a small amount of herbs or spices to make sure the grinder is working properly and that there are no residual cleaning agents or debris left behind.
By following these step-by-step instructions, you can keep your grinder in optimal condition, ensuring a consistent and enjoyable grinding experience every time. Remember to clean your grinder regularly to prevent any buildup that can affect its performance and longevity.
Extracting Hash from Your Grinder
Now that your grinder is squeaky clean, let’s explore a bonus benefit – hash extraction. Hash, a concentrated form of cannabis, can be collected from your grinder and enjoyed in various ways.
But before we dive into the techniques for hash extraction, let’s take a closer look at what exactly hash is and how it is formed in a grinder.
What is Hash and How is it Formed in a Grinder?
Hash is a concentrated form of cannabis made by collecting and compressing the resin glands, also known as trichomes, found on the buds. These trichomes contain a high concentration of cannabinoids, the compounds responsible for the psychoactive and medicinal effects of cannabis.
When you grind your cannabis buds in a grinder, the trichomes can get trapped on the teeth and screen of the grinder. Over time, these trichomes accumulate and form a sticky resin that can be harvested and transformed into hash.
Now that we have a better understanding of what hash is and how it forms in a grinder, let’s explore some techniques for extracting it.
Techniques for Hash Extraction
There are several methods for extracting hash from your grinder, each with its own unique approach and results. Let’s take a closer look at two popular techniques:
1. Gently Scraping the Grinder Teeth and Screen:
One common method involves gently scraping the grinder teeth and screen with a small brush or scraper. By doing this, you can collect the resin that has accumulated on these surfaces. The collected resin can then be pressed into a small, dense piece of hash.
2. Freezing and Tapping the Grinder:
Another technique involves freezing the grinder for a short period of time. Freezing the grinder helps to harden the resin, making it easier to dislodge. Once the grinder is frozen, you can tap it on a hard surface, causing the resin to break off and fall out. This resin can then be further processed into hash.
These are just a couple of examples of the many techniques that hash enthusiasts use to extract hash from their grinders. Each method offers a unique experience and can result in different textures and flavors of hash.
So, the next time you clean your grinder, don’t forget to consider the potential for hash extraction. It’s a rewarding and enjoyable way to make the most out of your cannabis experience.
Post-Cleaning Maintenance Tips
Congratulations! You have successfully cleaned your grinder and perhaps even collected some delicious hash. To maintain optimal grinder performance and prevent excessive hash buildup, consider the following tips:
How to Prevent Excessive Hash Buildup
Periodically clean your grinder to prevent resin buildup. Regular cleaning will ensure smooth grinding and minimize the need for deep cleaning sessions.
Regular Cleaning Schedule for Optimal Grinder Performance
Establish a cleaning schedule based on your grinder usage. For heavy users, a monthly deep cleaning might be necessary, while occasional users may only need to clean their grinder every few months. Find a routine that works best for you and stick to it.
By maintaining a clean grinder, you’ll enjoy consistent grinding performance and a higher-quality cannabis experience. With the added bonus of hash extraction, cleaning your grinder becomes a rewarding and beneficial process. Follow the steps outlined in this article, gather your cleaning tools, and embark on a journey to a spotless grinder and some delicious hash.