
Summer is here, and that means it’s time to make sure your Carrier air conditioner is in top shape. Regular maintenance is important to ensure optimal performance and energy efficiency. One crucial aspect of maintenance is cleaning your air conditioner. In this step-by-step guide, we will walk you through the process of cleaning your Carrier air conditioner to keep it running smoothly all season long. Let’s dive in!
Understanding Your Carrier Air Conditioner
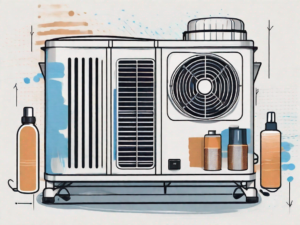
Before we begin the cleaning process, it’s important to familiarize yourself with the key components of your Carrier air conditioner. This will help you better understand the cleaning steps involved and ensure you’re not damaging any sensitive parts.
Your Carrier air conditioner is a complex system that consists of various components working together to provide you with cool and comfortable air. Let’s take a closer look at some of the key components:
Air Filter
The air filter is an essential part of your Carrier air conditioner. It is responsible for trapping dust, pollen, and other airborne particles, ensuring that the air you breathe is clean and free from allergens. Over time, the air filter can become clogged with dirt and debris, affecting the efficiency of your air conditioner. Regular cleaning or replacement of the air filter is necessary to maintain optimal performance.
Condenser Coils
The condenser coils play a vital role in the cooling process of your Carrier air conditioner. These coils are located in the outdoor unit and are responsible for releasing heat from the refrigerant. As the warm air from your home passes over the condenser coils, the heat is transferred to the outside air, allowing the refrigerant to cool down and circulate back into your home as cold air. Keeping the condenser coils clean is crucial for efficient heat transfer and overall cooling performance.
Evaporator Coils
The evaporator coils are located in the indoor unit of your Carrier air conditioner. These coils are responsible for absorbing heat from the air inside your home, allowing the refrigerant to cool down and circulate back into the outdoor unit. Over time, the evaporator coils can accumulate dirt and debris, hindering their ability to absorb heat effectively. Regular cleaning of the evaporator coils is necessary to maintain efficient cooling and prevent energy wastage.
Understanding the functions of these key components will help you appreciate the importance of cleaning them regularly. Now that we have a better understanding of your Carrier air conditioner, let’s move on to some safety precautions you should take before starting the cleaning process.
Safety Precautions Before Cleaning
Before you start cleaning your Carrier air conditioner, it’s essential to take some safety precautions. These precautions will ensure your well-being and prevent any accidents or damage to the unit.
First and foremost, turn off the power source to your air conditioner. This will prevent any electrical mishaps while you’re cleaning the unit. Locate the main power switch or circuit breaker dedicated to your air conditioner and switch it off. Safety should always be a top priority!
Additionally, wearing protective gloves and eyewear is highly recommended. Cleaning your air conditioner involves handling chemicals and potentially sharp objects, so it’s important to protect yourself from any potential harm. Gloves will protect your hands from any chemicals or sharp edges, while eyewear will shield your eyes from debris or cleaning solutions.
By taking these safety precautions, you can ensure a safe and effective cleaning process for your Carrier air conditioner. Now that we’re ready to proceed, let’s dive into the step-by-step cleaning instructions!
Gathering the Necessary Cleaning Supplies
Now that you’re familiar with your Carrier air conditioner and have taken the necessary safety precautions, it’s time to gather the cleaning supplies you’ll need for the task.
But before we dive into the details, let’s talk about the importance of regular maintenance for your air conditioner. Just like any other appliance, your air conditioner requires proper care to ensure optimal performance and longevity. Regular cleaning not only improves the efficiency of your unit but also helps maintain good indoor air quality. So, let’s get started!
Common Household Items You’ll Need
Believe it or not, you probably already have some of the cleaning supplies you need right in your own home. Grab a vacuum cleaner with a brush attachment, a soft-bristle brush, a bucket of warm water, and some mild detergent.
Now, let’s talk about why these items are essential for cleaning your air conditioner. The vacuum cleaner with a brush attachment will help you remove loose dirt, dust, and debris from the external parts of your unit. The soft-bristle brush will come in handy for gently scrubbing away any stubborn dirt or grime that may have accumulated over time. And of course, the bucket of warm water and mild detergent will be used to create a cleaning solution that is safe and effective for your air conditioner.
Specialized Cleaning Products for Air Conditioners
In addition to common household items, there are specialized cleaning products available specifically for cleaning air conditioners. These products are formulated to remove stubborn dirt and debris effectively. Consider purchasing an air conditioner coil cleaner and a foaming coil cleaner for optimal results.
Now, you might be wondering why these specialized cleaning products are necessary. Well, air conditioner coil cleaners are designed to penetrate deep into the coils of your unit, effectively removing dirt, dust, and other contaminants that can hinder its performance. Foaming coil cleaners, on the other hand, create a thick foam that clings to the coils, allowing for a more thorough cleaning process. These products are specifically formulated to ensure that your air conditioner is free from any buildup that could potentially reduce its efficiency.
So, whether you choose to use common household items or invest in specialized cleaning products, it’s important to gather all the necessary supplies before starting the cleaning process. This will ensure that you have everything you need to give your air conditioner the TLC it deserves.
Pre-Cleaning Steps for Your Carrier Air Conditioner
Before diving into the actual cleaning process, there are a few essential pre-cleaning steps you need to take to ensure a smooth and effective cleaning experience.
Proper maintenance and cleaning of your Carrier air conditioner are crucial to ensure its optimal performance and longevity. By following these pre-cleaning steps, you can ensure that your cleaning process goes smoothly and that your air conditioner remains in top-notch condition.
Switching Off the Power Source
As mentioned earlier, it’s crucial to turn off the power source before cleaning your Carrier air conditioner. This will prevent any accidents and ensure your safety throughout the process. Locate the power switch or circuit breaker and turn it off.
Before proceeding with the cleaning, it is important to emphasize the significance of switching off the power source. This step is essential to avoid any electrical mishaps and to protect yourself from potential harm. By disconnecting the power, you eliminate the risk of electric shock and ensure a safe working environment.
Removing the Air Conditioner Cover
With the power off, it’s time to remove the air conditioner cover. Carefully lift it off and set it aside. Take a moment to inspect the cover for any visible signs of damage. If you notice any cracks or breaks, it may be time to replace the cover.
The air conditioner cover plays a crucial role in protecting the internal components of your Carrier air conditioner from external elements such as dust, debris, and weather conditions. By removing the cover, you gain access to the inner workings of the unit, allowing for a thorough cleaning process.
Inspecting the cover for any visible signs of damage is an important step in ensuring the longevity of your air conditioner. Cracks or breaks in the cover can compromise its ability to protect the unit, allowing unwanted elements to enter and potentially damage the internal components. If you notice any damage, it is recommended to replace the cover to maintain the optimal performance of your Carrier air conditioner.
Detailed Cleaning Process
Now that you’re all set with the necessary cleaning supplies and have completed the pre-cleaning steps let’s move on to the actual cleaning process of your Carrier air conditioner.
Cleaning the Air Filter
The air filter is responsible for trapping dust, dirt, and other airborne particles to keep the air in your home clean. Over time, the air filter can become clogged and obstruct the airflow. Cleaning the air filter regularly is crucial for maintaining the efficiency of your air conditioner.
To clean the air filter, begin by removing it from the unit. Take a soft-bristle brush and gently scrub away any visible dirt and debris. If the filter is heavily soiled, you might consider soaking it in a mixture of warm water and mild detergent. Rinse the filter thoroughly and allow it to dry completely before reinstalling it.
Cleaning the Condenser Coils
The condenser coils are responsible for releasing the heat absorbed from inside your home. Over time, these coils can become dirty and obstruct the heat transfer process. Cleaning the condenser coils will help your air conditioner operate more efficiently and effectively.
To clean the condenser coils, start by using a vacuum cleaner with a brush attachment to remove any loose dirt and debris. Next, apply the specialized air conditioner coil cleaner according to the manufacturer’s instructions. Allow the cleaner to sit for a few minutes to loosen any stubborn grime. Finally, rinse the coils thoroughly with water to remove all traces of the cleaner. Take care not to bend the delicate fins while cleaning.
Cleaning the Evaporator Coils
The evaporator coils are responsible for absorbing heat from the air inside your home. Over time, these coils can accumulate dust and dirt, hindering their efficiency. Cleaning the evaporator coils will ensure optimal heat absorption and improve the overall performance of your air conditioner.
Start by locating the evaporator coils, which are typically found inside the air handler unit. Gently brush away any loose dirt and debris using a soft-bristle brush. Next, apply the foaming coil cleaner to the coils, following the manufacturer’s instructions. Allow the cleaner to penetrate for a few minutes before rinsing the coils thoroughly with water. Take care not to allow any water to enter the unit.
Post-Cleaning Steps for Your Carrier Air Conditioner
Congratulations! You’ve successfully completed the cleaning process for your Carrier air conditioner. Now, it’s time to wrap things up with a few post-cleaning steps.
Reassembling Your Air Conditioner
With the coils and air filter all cleaned, it’s time to reassemble your Carrier air conditioner. Start by carefully putting the air conditioner cover back in place, ensuring it fits snugly. Take a moment to inspect the cover for any visible damage before securing it.
Turning the Power Back On
Now that everything is back in place, it’s time to turn the power back on. Locate the power switch or circuit breaker and flip it back on. You should hear your air conditioner humming back to life.
Congratulations once again on successfully cleaning your Carrier air conditioner! By following this step-by-step guide, you have ensured that your air conditioner is ready to provide you with cool, comfortable air all summer long. Regular cleaning and maintenance will extend the lifespan of your air conditioner and improve its overall performance. Happy cooling!