
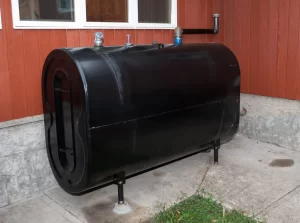
If you have an outside oil tank for heating your home, you’ll want to make sure that you keep the filter clean to ensure that it’s running efficiently. A dirty filter can cause your heating system to work harder, and it can also lead to premature wear and tear on the equipment. In this article, we will walk you through the step-by-step process of cleaning a filter on an outside oil tank.
Understanding the Importance of a Clean Oil Tank Filter
Before we dive into the cleaning process, it’s important to understand why a clean oil tank filter is so important. The filter plays a critical role in keeping your heating system running smoothly by removing impurities from the oil. Over time, the filter can become clogged with dirt and debris, which means that it can’t do its job effectively. This can lead to a reduction in heating performance, higher energy bills, and even equipment failure.
Not only does a dirty oil tank filter lead to a decrease in heating performance, but it can also cause damage to your heating system. When the filter is clogged, the oil pump has to work harder to push the oil through the system. This can cause the pump to wear out faster, leading to expensive repairs or even replacement of the entire heating system.
Why you should clean your oil tank filter regularly
To ensure that your heating system is running efficiently, it’s important to clean your oil tank filter regularly. Most experts recommend that you clean the filter at least once a year, although it may need to be done more frequently if you use your heating system frequently.
Regularly cleaning the oil tank filter can also help to extend the life of your heating system. By removing dirt and debris from the oil, you can prevent damage to the oil pump and other components of the heating system. This can save you money in the long run by avoiding costly repairs or replacement of your heating system.
Signs that your oil tank filter needs cleaning
There are a few signs that you may notice that could indicate that your oil tank filter needs cleaning. These include:
- Increased energy bills: If your energy bills have been steadily increasing, it could be a sign that your heating system is not running efficiently due to a dirty oil tank filter.
- Reduced heating performance: If your home is not heating up as quickly or as thoroughly as it used to, it could be a sign that your oil tank filter needs cleaning.
- Noisy operation: If your heating system is making unusual noises, such as banging or clanging, it could be a sign that the oil pump is working harder than it should be due to a clogged filter.
- Equipment failure: In extreme cases, a dirty oil tank filter can cause your heating system to fail completely. If you notice that your heating system is not working at all, it could be due to a clogged filter.
Overall, regular cleaning of your oil tank filter is essential for maintaining the efficiency and longevity of your heating system. By keeping your filter clean, you can avoid costly repairs and replacements, and ensure that your home stays warm and comfortable all winter long.
Safety Precautions Before Cleaning the Filter
Before you start the cleaning process, there are a few safety precautions that you should take to ensure that you and those around you stay safe. Cleaning the filter can be a messy and potentially dangerous task, so it’s important to take the necessary precautions.
Gather necessary safety equipment
First and foremost, you’ll need to gather the necessary safety equipment. This includes goggles, gloves, and protective clothing. It’s important to wear these items to prevent any oil from getting on your skin, which can cause irritation or even chemical burns.
In addition to protective clothing, it’s important to have a fire extinguisher nearby, just in case. While it’s unlikely that a fire will break out, it’s always better to be safe than sorry.
Turn off the oil supply
Before you start cleaning the filter, you’ll need to turn off the oil supply to prevent any oil from spilling out. This is an important step that should not be overlooked, as it can prevent a potential mess and also keep you safe from any hot oil that may be present.
Ventilate the area
Another important safety precaution is to ventilate the area where you will be cleaning the filter. This is important to prevent any build-up of fumes, which can be harmful if inhaled. Open windows and doors to allow fresh air to circulate, and use a fan if necessary to keep the air moving.
It’s also a good idea to make sure that the area is well-lit so that you can see what you’re doing. This can help you avoid any potential hazards and ensure that you’re able to clean the filter thoroughly.
Conclusion
By taking these safety precautions, you can ensure that you stay safe while cleaning the filter. Remember to wear protective clothing, turn off the oil supply, ventilate the area, and keep a fire extinguisher nearby. With these measures in place, you can tackle the task of cleaning the filter with confidence and peace of mind.
Tools and Materials Needed for Cleaning the Filter
Now that you’ve taken the necessary safety precautions, let’s look at the tools and materials that you’ll need for cleaning the filter.
Basic tools for filter cleaning
Cleaning your filter requires a few basic tools – we have found the products below most helpful:
- An adjustable wrench to loosen and tighten bolts and nuts
- A socket set or pliers to remove and replace parts
- A filter wrench to grip and turn the filter
- A bucket to collect any excess water or debris
Cleaning solutions and materials
Aside from the basic tools, you’ll also need some cleaning solutions – the products below are highly effective:
- Rags or towels to wipe away any excess dirt or grime
- A degreaser or cleaning agent to break down any grease or oil buildup
- A scrub brush or wire brush to scrub away any stubborn debris or buildup
It’s important to note that not all cleaning solutions and materials are created equal. Be sure to choose a degreaser or cleaning agent that is specifically designed for your type of filter. Using the wrong type of cleaning solution can cause damage to your filter or reduce its effectiveness.
Additionally, make sure to wear gloves and protective eyewear when handling any cleaning solutions or materials to avoid skin irritation or eye damage.
Step-by-Step Guide to Cleaning the Filter
Regular maintenance of your heating system is essential to keep it running smoothly and efficiently. One of the most important tasks is cleaning the filter. A dirty filter can cause your heating system to work harder, use more energy, and even breakdown. In this guide, we’ll walk you through the steps to clean your oil tank filter.
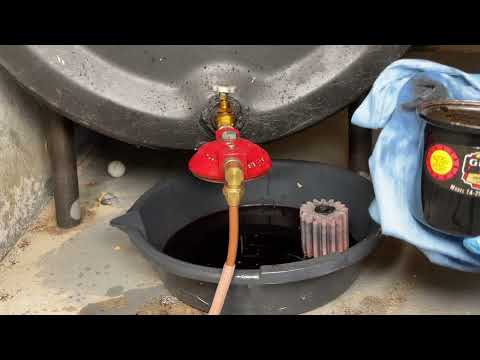
Step 1: Locate the filter
The first step is to locate the filter. The oil tank filter is typically located near the oil tank, and it will be enclosed in a metal cover. It’s important to know where the filter is located so that you can easily access it for cleaning.
Step 2: Remove the filter cover
Once you’ve located the filter, you’ll need to remove the cover to access it. To remove the cover, use an adjustable wrench or pliers to loosen the nuts that are holding it in place. Be careful not to damage the cover or the nuts.
Step 3: Take out the filter
Gently remove the filter from its housing and place it in a bucket. Be sure to wear gloves to protect your hands from any oil or debris on the filter.
Step 4: Clean the filter
Now it’s time to clean the filter. Use a cleaning agent or degreaser to clean the filter. There are many different types of cleaning agents available, so be sure to choose one that is safe for your filter. Use a scrub or wire brush to remove any build-up of dirt or debris. Be sure to clean both the inside and outside of the filter. Rinse the filter thoroughly with water and allow it to dry completely before reinstalling it.
Step 5: Inspect the filter for damage
Inspect the filter for any signs of damage, such as cracks or holes. If there are any signs of damage, you’ll need to replace the filter. A damaged filter can cause your heating system to work harder and use more energy, which can lead to higher heating bills.
Step 6: Reassemble and reinstall the filter
Once the filter is clean and dry, it’s time to reassemble and reinstall it. Carefully place the filter back into its housing, making sure it is properly aligned. Reassemble the filter cover and reinstall the filter. Use a filter wrench or pliers to tighten the nuts and ensure that the cover is securely in place.
Now that you’ve completed the cleaning process, turn the oil supply back on and test your heating system to ensure that it’s running smoothly. With regular cleaning and maintenance, you can keep your outside oil tank and heating system working efficiently for years to come.
Remember, cleaning the filter is just one part of regular maintenance for your heating system. Be sure to schedule an annual tune-up with a qualified technician to keep your system in top condition.